Blogger news

Membuat Foto Terpisah - Pisah

    Hai sobat jumpa lagi di IndoPhotoshop , gimana kabarnya harus tetep semangat ya Kali ini saya akan menunjukkan cara membuat foto menjadi lebih menarik, hmmm saya pun bingung mau kasi judul yang lebih spesifik pokok e hasil akhirnya seperti gambar diatas itu tu. Ok deh langsung aja kita praktekin Tutorial Photoshop kali ini 
  1. Pertama siapkan foto yang akan kita edit2 disini saya menggunakan foto anak2 yang lagi ketawa terbahak2 kalau mau ambil gambar yang seperti yang saya pakai bisa di download disini Selanjutnya buka gambar tersebut kedalam aplikasi Adobe photoshop
  2. sekarang buat sebuah layer baru (shift + ctrl + N) ato mengklik icon Create New Layer seperti pada gambar dibawah ini
  3. Indophotoshop Tutorial Photoshop
  4. selanjutnya aktifkan Rectangular Marquee Tool lalu sambil menekan tombol shfit (Agar panjang dan lebar nya sama) buat sebuah persegi lalu dengan menggunakan Paint Bucket Tool warnai seleksi tadi dengan warna putih
  5. Indophotoshop Tutorial Photoshop
  6. Jika sudah tekan CTRL + d pada keyboard maka seleksi tadi hilang. Buat lagi seleksi dengan menggunakan rectangular marquee tool hanya ukurannya lebih kecil dari persegi yang kita buat tadi lalu tekan tombol Delete lalu tekan CTRL + D
  7. Indophotoshop Tutorial Photoshop
  8. Selanjutnya gandakan layer 1 hingga menjadi 5 buah layer dengan menekan CTRL + J
  9. Indophotoshop Tutorial Photoshop
  10. Selanjutnya aktifkan Magic Wand Tool (W) lalu klik pada bagian dalam frame nya maka akan menghasilkan sebuah seleksi persegi (gbr 1), lalu klik layer background (gbr 2) lalu tekan ctrl + J maka hasilnya bisa dilihat pada gambar 3 dibawah ini
  11. Indophotoshop Tutorial Photoshop
    Klik Untuk Zoom Gambar
  12. Selanjutnya seleksi/pilih Layer 1 (frame) dan layer 2 (layer hasil ganda) dengan menekan tombol CTRL lalu klik kedua layer (gbr 1) tersebut selanjutnya Tekan CTRL + E maka kedua layer tersebut akan bergabung menjadi 1 layer (gbr 2)
  13. Indophotoshop Tutorial Photoshop
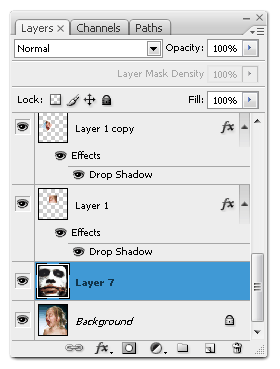
  14. Selanjutnya buka menu layer - layer style - drop shadow trus atur properti2 nya seperti gambar dibawah ini lalu klik OK
  15. Indophotoshop Tutorial Photoshop
    Klik Untuk Zoom Gambar
  16. Selanjutnya klik Layer 1 Copy (gbr1) trus tekan CTRL + T nah pindahkan dan rotasikan sedikit frame tersebut (gbr2) lalu tekan Enter
  17. Indophotoshop Tutorial Photoshop
  18. Lalu dengan menggunakan Magic wan tool seleksi bagian dalam frame seperti langkah ke-6 trus pilih layer background lalu tekan CTRL + J
  19. Indophotoshop Tutorial Photoshop
  20. seleksi/pilih layer 2 dan layer frame lalu satukan seperti langkah 7
  21. Indophotoshop Tutorial Photoshop
  22. Setelah itu beri Layer Style Drop Shadow seperti tahap ke-8
  23. Coba perhatikan gambar kita seharusnya bagian frame yang saya tandai dengan warna merah ini (lihat gambar 1 dibawah) tidak terlihat sehingga seperti gambar 2 dibawah ini. Nah sebenarnya Frame tersebut memang sudah tidak terlihat hanya karena masih ada 3 Frame yang belum kita selesaikan (lihat gbr 3), Jadi coba selesaikan 3 frame tersebut dengan mengikuti tahap 9 hingga tahap 12
  24. Indophotoshop Tutorial Photoshop
    Klik Untuk Zoom Gambar
  25. Nah setelah semua Frame selesai maka gambar akan terlihat seperti gambar dibawah ini, O ya kamu juga bisa menambah Frame nya dan untuk tempat dan rotasi Frame nya kamu bisa kreasikan sesuai keinginan kamu
  26. Indophotoshop Tutorial Photoshop
  27. Jika semua Frame sudah selesai sekarang kita ubah background gambar nya, pilih gambar background kamu lalu pindahkan ke gambar kita lalu tempatkan gambar nya diatas gambar background
  28. maka Hasil akhir dari tutorial photsohop (mengedit foto menjadi terpisah-pisah) seperti gambar dibawah ini, ya mungkin hasilnya ga akan sama tapi kita harus bangga atas apa yang uda kita buat betul ga?

    Indophotoshop Tutorial Photoshop

    Indophotoshop Tutorial Photoshop

Cara Menggabungkan Gambar dengan Photoshop


Dalam Tutorial Photoshop kali ini Saya akan menunjukkan beberapa cara untuk menggabungkan dua atau lebih gambar menjadi satu gambar. Ok langsung aja saya tunjukkan
  • Cara Menggabungkan Gambar (cara 1)
  • Buka 2 buah gambar yang akan digabungkan dengan Photoshop, disini saya menggunakan 2 buah gambar mata dibawah ini
    Lalu drag gambar 1 ke gambar 2 dengan menggunakan Move Tool lalu tekan CTRL + T nah tentukan posisi dan ukurannya sehingga seperti gambar dibawah ini
  • Cara Menggabungkan Gambar (cara 2)
  • lipat gandakan lebar gambar 1 dari menu Image - Canvas Size lalu tekan CTRL + J maka layer akan diduplikasi (lihat gambar 1 dibawah ini) lalu dengan menggunakan Move Tool geser gambar hingga merapat ke sisi dokumen (lihat gambar 2)
    lalu drag gambar yang satunya lagi kegambar kita yang tadi seperti gambar dibawah ini
  • Cara Menggabungkan Gambar (cara 3)
  • Untuk yang satu ini saya menggunakan gambar lain agar lebih mudah, terkadang saat ingin menggambungkan gambar kita ingin menghilangkan garis atau border gambar seperti gambar 1 dibawah ini
    Nah untuk mengatasinya kita bisa menggunakan Eraser Tool lalu klik kanan pada dokumen atur hardness brushnya 0% lalu hapus garis/border gambar nya
    Mungkin sudah cukup disini dulu tutorial menggabungkan gambar dengan photoshop kali ini, sebenarnya masih banyak teknik untuk menggabungkan beberapa gambar menjadi satu hanya teori dasarnya sudah saya tunjukkan pada tutorial diatas. Ok sampai jumpa di Tutorial berikutnya, chow

Membuat Gambar Efek CCTV

Indophotoshop.blogspot.com

Pada kesempatan kali ini Saya akan menunjukkan sebuah Tutorial Photoshop yaitu membuat gambar efek CCTV yang hasilnya akhirnya bisa dilihat pada agmbar diatas, Ok ga usa banyak cincong ya Silahkan ikuti langkah-langkah dalam membuat gambar efek CCTV berikut ini

Bahan yang diperlukan :
Gambar Perkotaan.jpg

  • Buka gambar perkotaan yang sudah kamu download diatas dengan Adobe Photoshop
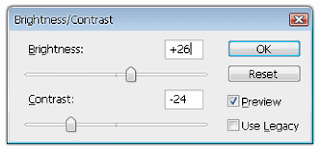
  • Buka menu Layer - New Adhustment Layer - Brightness/ Contrast maka akan muncul sebuah window klik OK saja lalu atur properti nya
    seperti gambar dibawah ini , dari menu yang sama atur juga properti untuk Hue/Saturation. Lalu buka menu Layer - New Fill Layer - Gradient pengaturan propertinya lihat pada gambar dibawah ini
  • Indophotoshop.blogspot.com
    Indophotoshop.blogspot.com
    Indophotoshop.blogspot.com
  • Selanjutnya ubah Blending Mode dari Gradient Fiil tadi menjadi Soft Light
  • Indophotoshop.blogspot.com
  • Lalu buat sebuah layer baru (shift + ctrl + n atau klik Icon New Layer) dan dengan menggunakan Paint Bucket Tool warnai layer tersebut dengan warna putih
  • Indophotoshop.blogspot.com
  • Selanjutnya buka menu Filter - Sketch - Halftone Pattern atur propertinya seperti gambar dibawah ini
  • Indophotoshop.blogspot.com
  • Ubah Blending Modenya menjadi Darken dan ubah Opacitynya menjadi 35%
  • Indophotoshop.blogspot.com
  • Hampir selesai buka menu Layer - New Fill Layer - Solid Color lalu gunakan warna #00eaff ubah blending Mode layernya menjadi Soft Light dan Opacity 25%. Jadi deh
  • Indophotoshop.blogspot.com
    Indophotoshop.blogspot.com

Create a Nebula Cosmolady

Photoshop Tutorials

Create a Nebula Cosmolady


Step 1.)

Let start opening a new 300 DPI file on 4200px x 5100px. We will use beautiful Cosmo and Nebulas Pictures provide to us by


Step 2.)
We will add more lightning and turn our galaxies into a dramatic mood. By using levels (Cmd/Ctrl + L) with this settings (9 – 1,00 – 255), and change the blending mode to screen.

Step 3.)
To blend our pictures edges with the background pick the 200px brush make a layer mask on the layer we are working on and open the brush engine. Set the scattering 121% and set the control off, count – 1, count jitter – 1%.
6

Step 4.)
Go to the layer mask and paint with black in 20% of brush opacity the edges of the bottom image to blend it with our black background.
6

Step 5.)
Add 2 more nebula pictures on the top of layers and repeat the 3 last steps.

Step 6.)
Now Select all (Cmd/Ctrl + A) and (Cmd/Ctrl+Shift + C) and Paste on the top of layers, set the blending mode to screen and make a layer mask and fill it with black.

Step 7.)
By using 100px round brush (this brush size can change depending on the area you are revealing) on 20% brush opacity star painting and revealing our highlights as you in the screenshot.

Step 8.)
Duplicate the layer and delete the layer mask and set the blending mode to normal. Go to filter – Other – High Pass with 6, 0 Radius. Set this layer to overlay.

Step 9.)
With the High Pass layer we want to make more brightness on our picture, so use the Dodge tool with the highlights setting in 12% and 182px brush size and start painting the highlights areas (this brush size can change depending on the area you are revealing).

Step 10.)
Go to Adjustment layers and add Hue Saturation bring the picture some new colors. You can achieve this by using the same techniques of brushes and layer masks. Use the colors you like most and play around with different adjustment layers.

Step 11.)
On this step you need to go to
and buy the girl picture.
Or you can use one of our

Step 12.)
Next go to Hue/Saturation (Cmd/Ctrl + U) and apply the screenshot settings. The use the Fade Control (Cmd/Ctrl + F) and apply the screenshot settings. Repeat this step and pick some color of the picture.

Step 13.)
Then go to Filter – Sharpen – Unsharpmask and use the screenshot settings.

Step 14.)
Duplicate the layer and apply the High Pass effect and use the same techniques of the step 8.

Step 15.)
In this steps we going to crop the lens glasses with the pen tool and fill them with the part of the background to create a reflection. Take care with the lightning in the scene and make the shine with the gradient tool.

Step 16.)
Add a new one Hue/Saturation adjustment layer and fill the mask with black and start revealing the new color on the areas you see in the screenshot to make a good integration with the background.

Step 17.)
Add some flares in areas of the girl with different brushes sizes.

Step 18.)
Now go to Image – Duplicate the File to start working just with the girl. Delete the nebulas background and merge all girl layers (Cmd/Ctrl+E) and let start to create some shapes to cut off the holes. Use the pen tool to do the shapes.

Step 19.)
Using the Pen Tool make a path, convert to selection, and fill it with black to make the black hole on the girl arm.

Step 20.)
Then use the same Selection to duplicate the Shape of the girl arm using (Cmd+Ctrl + J) put this layer on the top and go to Edit – Free Transform and move your anchor point to the left bottom and move your Arm Shape some grades to the right.

Step 21.)
Over again use the path and repeat the Selection step and Select go to Select – Modify – Contract and use the screenshot settings. Here we are going to create the Hole Edges.

Step 22.)
Use the Dodge tool and Burn tool to add the highlights and shadows on the hole edges and add more details painting the areas where you need more shadows or highlights.

Step 23.)
We need to add some shadows in the bottom of the arm shape to integrate it with the whole picture. Check out our screenshots

Step 24.)
Repeat the 19 to 22 steps to create more holes in the girl body.

Step 25.)
Add some more depth to the girl photo. Make 4 adjustment curves layers (2 for shades, 1 for highlights and 1 for eyes color) repeat the same techniques of layer mask and brush painting.

Step 26.)
Then add some flares using the brush tool with different sizes.

Step 27.)
We use some pictures from
to add some sparkles. Change the blending mode to screen and the selection and transform tools to make each spark larger.

Step 28.)
Next we add color lights with different brushes sizes and screen blending mode.

Step 29.)
In this step we going to add some dynamic lines and gradients. Pick the rectangular marquee tool and fill your selection with different color gradients, as you see on the screenshot.

Step 30.)
Lets add the 3d models we provide in this tutorial. Pay close attention to lightning on your scene and use the different mask, curves and brush techniques you learned, to integrate the 3d.

Step 31.)
To create more depth lets add a bigger 3d model in front of our artwork, and with lasso tool select the closer part of the render and go to Select – Feather – 30%, then go to Filter – Blur – Motion Blur – Angle 79 – Distance 10px. This will create a depth of field sense.

Step 32.)
Now we will turn the colors to a vintage look, adding curves as you see in the picture.

Step 33.)
Finally, we duplicate the artwork an go to Filter- Stylize-Glowing edges. And use the settings on the screenshot. The change the blending mode to soft light and the opacity to 45% and that’s all folks.


Copyright @ 2013 Photoshop Tutorials.

Designed by Templateify & Sponsored By Twigplay